Custom Mossberg 500


Build details
Last year saw the landmark 10-millionth production Model 500 pump roll off the O.F. Mossberg & Sons assembly line in Connecticut, making it the fastest-selling shotgun model of all time. With so many configurations and gauges used by law enforcement, military personnel, and hunters, America is awash in the Mossberg 500 in numbers few firearms models can match.
So what does this mean to someone in the market for a new shotgun (or new to them, anyway) but uncertain of which gun to get? Or to a regular shooter who is looking for something fun but not necessarily his new go-to duck gun? It means the Model 500s scattered among the nation’s used-gun racks are like a mess of LEGO in the hands of a creative child. Get one, or get pieces of several, and you can build a beast of a shotgun.
I decided to do this myself over the past couple of years. In a way it was an accident, but I learned a lot during the process, so I’m going to go ahead and just say I planned it this way.
The Cool Factor
IMG_1065
The first gun I tuned wasn’t a Mossberg 500; it was its more tactical brother, the Model 590. Modifications came in dribs and drabs, mostly because I couldn’t decide what to do first. Hitting the internet became an intimidating experience, simply because there was such a breadth of aftermarket parts and accessories out there for both the 500 and 590. It was hard to tell what was what without devoting some serious hours to research.
Browsing wasn’t working. I needed to decide what the gun would be used for first. I wanted my eight-shot, 12-gauge 590 to be a home-defense gun—something reliable, simple, and powerful that was easy to use in the dark with adrenaline coursing through the system.
First, the standard stock had to go. The hollow plastic works fine, but is it comfortable? Not really. Is it visually appealing? Uh-uh. And because there’s nothing to it, the gun doesn’t feel balanced. So I swapped it out for a Blackhawk SpecOps NRS adjustable stock with a pistol grip, a modular cheekpiece, and a five-shell carrier. I added a rubber grip sleeve, also from Blackhawk.
That took care of the back end. I didn’t have to worry about optics since the shotgun came with integrated ghost ring sights. Again, I looked at the gun’s intended function. If I ever have to use it, it will likely be in a dark, stressful situation. I couldn’t do anything about the stress, but I could eliminate the dark, at least.
I clamped an inexpensive LaserLyte tri-rail mount on the magazine tube behind the welded bayonet mount. Now there was a place to mount a green CMR-203 Rail Master laser sight and tac light, both from Crimson Trace.
So there I had it: a 12-gauge with nine rounds, a comfortable pistol grip with a stock adjusted to my length of pull, a horrifyingly bright light, a laser, five extra rounds on board, and a bit more peace of mind. And then I added a heat shield. You know, ’cause it’s freakin’ cool.
No Special Tools
IMG_1059
I couldn’t believe how much I was able to do to my 590 with simple-to-install add-on parts, and how well the finished product came out. I got the shotgun I wanted, and I got to play a bit. This deserved far deeper investigation. Lo and behold, I came across a 12-gauge Model 500 with a 3-inch chamber on the used rack at my local gun store for about $200. The thing still had factory grease on it.
It was a Turkey Thug model—hence the 3-inch chamber—but that also meant it came with a nicer LPA trigger.
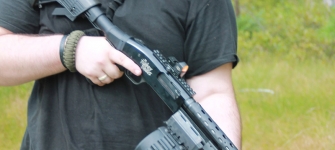
There was no question about the purpose of this gun. It was going to be the rudest, ugliest, meanest little pump on the range. It would be the gun I’d show to my friends and say, “Hee hee, look what I did.”
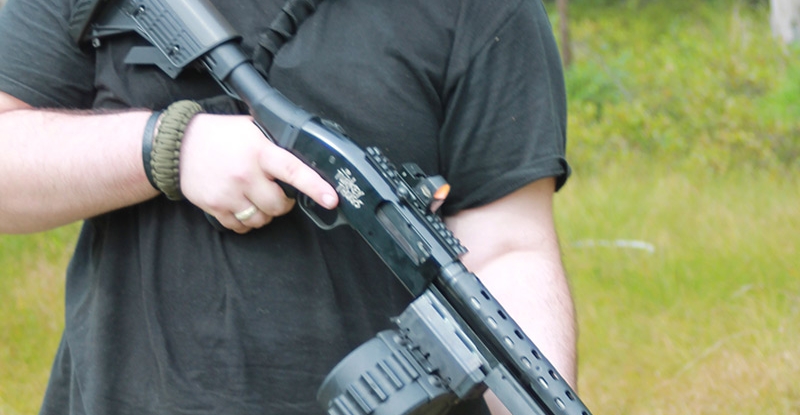
For the base of the build, I decided on a product I’d found while scouring the web for parts for my 590: the Sidewinder Venom conversion kit from Adaptive Tactical. (The kit can also be sourced from Brownells.) A very similar kit was produced by Knoxx in the 1990s, but it has since been discontinued. If you spend any time in Model 500 forums, of which there are many, it becomes obvious the Knoxx kits were one of the most coveted out-of-print Model 500 kits out there until Adaptive Tactical began producing them again.
The kit takes a bit of finesse to install, and a lot of patience, but in the end I replaced the magazine tube with the new mag well for the drum and follower tube mechanism in my garage with no special tools that weren’t included with the kit.
Let The Fun Begin
Once I reassembled the receiver, I replaced the Mossberg stock with another adjustable pistol-grip stock—this time a Talon from ATI, which came with a mount for a single-point sling. I went back to Blackhawk for its comfortable single-point Storm Sling.
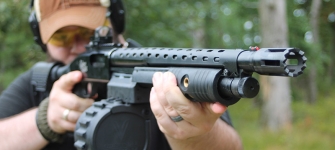
With that done, I replaced the 24-inch barrel and turkey choke with an 18-inch breacher barrel (wrapped in an ATI heat shield) I ordered from Mossberg. It all went together like a dream. The receiver, as with many new 500s, comes with holes already tapped. I screwed on a piece of Picatinny rail and a no-frills red-dot sight, and my beast was ready. The thing just looks mean, and at the range I’m able to run 16 shells with a reload (the kit came with a 5-round box magazine in addition to the 10-round drum) in 21 seconds. And it’s so much fun to shoot.
The lesson in all this? It’s fun to build a gun into something it wasn’t before, and the average customer can do it with a good base gun, the help of a couple of YouTube videos, and some guidance from a knowledgeable retailer. Adding a stock will get them past the fear of “messing” with the gun, because there’s really nothing they can ruin. When they ask about this at your shop, your job is to say, “Yes, you can,” and then suggest appropriate accessories, all of which they can source through you. If you have a relationship with a local gunsmith or one on site, you can recommend that he do the work for those customers who fear their do-it-yourself skills aren’t up to snuff. The confidence will get that aftermarket imagination running wild. And that means opportunity for you.-David Maccar

build comments